How to Make a Bear Out of a Hand Towel? 5 Easy Steps!
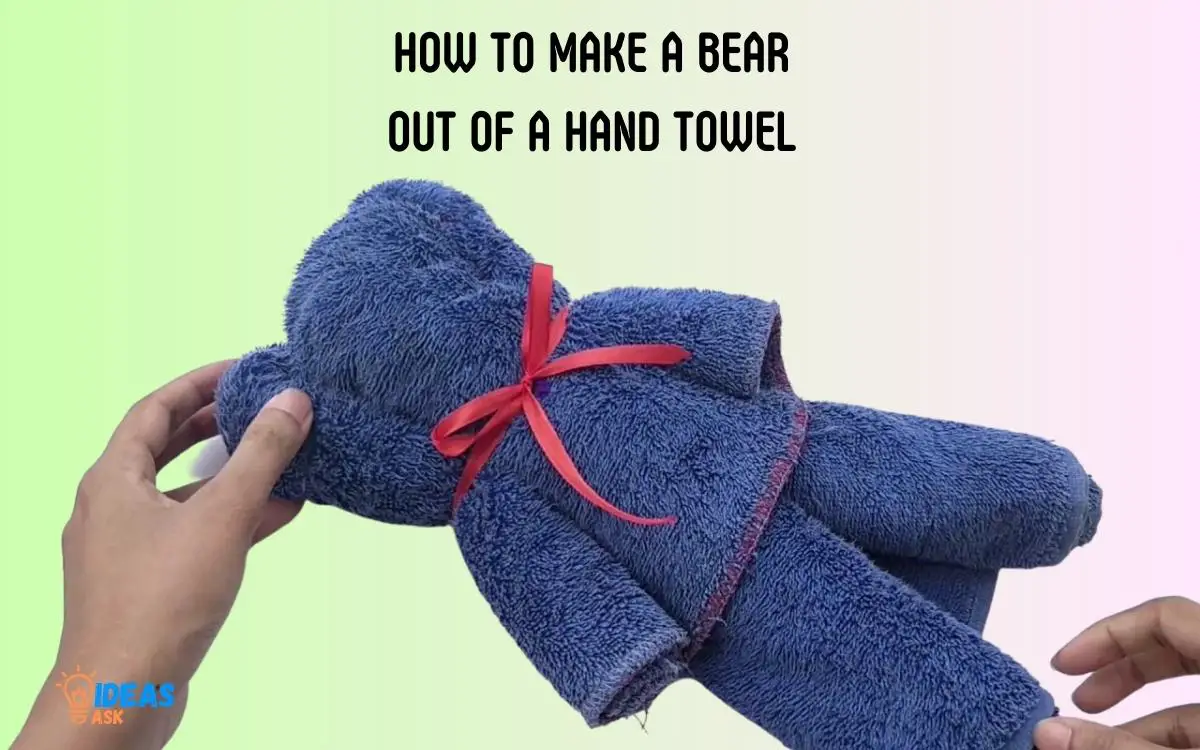
To make a bear out of a hand towel, first spread out the towel flat and fold it diagonally. Then roll both ends to the center, fold the rolled towel in half, and shape the folded end for the legs of the bear.
After that, take the loose ends, fold them up and back to make the head, and finally secure it with a rubber band.
Making a bear out of a hand towel is a fun and creative activity that doesn’t require a lot of materials. A hand towel, a rubber band and little bit of time is all you need to create this adorable craft.
This can be a good activity to engage kids or to add a unique touch to your home decor.
Making a bear out of a hand towel is not only fun but also utilitarian. It serves as a cute decor item and can be a unique gift idea.
Moreover, it allows kids to engage in a creative activity which can boost their fine motor skills and fuel their imagination. So, why wait? Grab a hand towel and start creating your adorable bear!

Key Takeaway
Step 1: Choosing The Right Hand Towel**
Learn how to make a bear out of a hand towel with these handy tips for choosing the right hand towel. Make sure to follow these guidelines to create a unique and cute addition to your bathroom decor.
Selecting A Soft And Absorbent Hand Towel
When it comes to making a bear out of a hand towel, selecting the right towel is essential.
Here are some factors to consider when choosing a hand towel for this project:
- Softness and Absorbency: Look for a hand towel that is soft and absorbent. This will ensure that the bear you make is comfortable and functional in soaking up any spills.
- Size and Color Options: Consider the size and color options available. While the size of the hand towel may vary, aim for one that is medium-sized so that you have enough material to work with. As for color, choose a shade that resembles a bear, such as brown or beige, to enhance the overall appearance of your creation.
Why A Square-Shaped Towel Works Best For Making A Bear
A square-shaped towel is ideal for making a bear due to its symmetry and versatility.
Here’s why:
- Symmetry: A square-shaped towel provides equal dimensions on all sides, allowing for easier folding and shaping to create the bear’s body, head, and limbs. This symmetry ensures that your bear looks well-proportioned and balanced.
- Versatility: The square shape offers flexibility in folding techniques and allows you to experiment with different shapes and angles. You can easily manipulate a square towel to form the bear’s features, like its ears, snout, and tail. This versatility makes it easier to achieve the desired bear-like appearance.
When making a bear out of a hand towel, it is important to choose a soft and absorbent towel. Consider the size and color options available, and opt for a square-shaped towel for its symmetry and versatility.
By taking these factors into account, you’ll be well on your way to creating a charming bear that is both cute and functional.
Step 2: Folding Techniques For The Bear’s Body
Learn how to create an adorable bear out of a hand towel with these effective folding techniques. Bring your towel to life in just a few simple steps!
Folding Techniques For The Bear’S Body
To create a cute bear out of a hand towel, you’ll need to master some folding techniques.
Follow these steps to transform a simple towel into an adorable bear-shaped creation:
Preparing the towel for folding:
- Lay the hand towel flat on a clean surface to begin.
- Smooth out any wrinkles or creases, ensuring a neat starting point.
- Make sure the towel is fully open and ready for folding.
Fold the towel diagonally to form a triangle:
- Take one corner of the hand towel and fold it across to the opposite corner, creating a triangle shape.
- Align the edges carefully to ensure an even fold.
- Press down firmly on the fold to secure it in place.
Rolling the towel from one corner to create a cylindrical shape:
- Starting from one corner of the triangle, tightly roll the towel towards the center, forming a long cylindrical shape.
- Continue rolling until you reach the opposite corner of the triangle, making sure the roll is compact and secure.
- The rolled towel should resemble the body of a bear.
Using rubber bands to secure the towel:
- Place one rubber band around the center of the towel roll to hold it firmly in place.
- Ensure the rubber band is taut but not too tight, allowing the towel to maintain its shape.
- Add additional rubber bands if necessary, evenly spacing them along the towel roll.
By following these folding techniques, you’ll be well on your way to crafting an adorable bear out of a hand towel.
The next step will involve adding details to complete the bear’s face and features. Stay tuned for the upcoming section on creating the bear’s head and limbs.
Step 3: Shaping The Bear’s Head And Ears
To shape the bear’s head and ears, fold the hand towel diagonally to form a triangle. Roll the edges of the triangle towards the center and secure with a rubber band. Then fold the corners inwards to create the bear’s ears.
A cute and easy craft to try!
Shaping The Bear’s Head And Ears
After creating the cylindrical body of the bear, it’s time to shape the head and ears. This step will bring your adorable hand towel bear to life.
Follow these simple instructions to get the perfect shape:
Folding The Top Corner Of The Cylinder To Create The Head
- Start by taking the top corner of the cylindrical shape and fold it diagonally towards the back. This will create a triangular shape at the top, forming the bear’s head.
- Secure the folded corner by gently pressing it down, ensuring that it holds its shape.
Tucking Excess Fabric Into The Head To Maintain Its Shape
- You may notice some excess fabric around the top of the triangular head shape. Gently tuck and fold this fabric into the triangular opening. This will help maintain the shape of the bear’s head and give it a more defined appearance.
Folding The Sides To Create The Ears
- Now, it’s time to create the bear’s ears. Starting from the sides of the triangular head shape, fold each side inward, towards the center.
- Ensure that the folds are symmetrical, so that the ears are of equal size and shape.
- Press down gently to secure the folds.
By following these instructions, you will shape the head and ears of your cute hand towel bear. This step adds personality and dimension to your creation, and brings you one step closer to completing your adorable DIY project.
Step 4: Giving Your Bear A Face
Craft a charming hand towel bear by giving it a cute face, following these simple steps. Enhance your crafting skills with this easy DIY project.
Selecting Small Buttons Or Beads For The Eyes:
- Choose small buttons or beads that will serve as the eyes for your hand towel bear. These can be found in craft stores and come in a variety of colors and sizes.
- Ensure that the buttons or beads are securely attached to the bear’s head to prevent them from falling off.
- Position the eyes symmetrically on the bear’s face to create a balanced and appealing appearance.
Choosing A Material For The Nose, Such As A Pom-Pom Or Embroidery Thread:
- Decide on the material you want to use for the bear’s nose, whether it’s a pom-pom or embroidery thread.
- A pom-pom can add a cute and fluffy touch to the bear’s face, while embroidery thread can create a more detailed and textured nose.
- Match the color of the nose to the color scheme of your bear or choose a contrasting color to make it stand out.
Adding A Mouth Using Fabric Markers Or Embroidery:
- Use fabric markers to draw a smile or any other desired shape for your bear’s mouth.
- Fabric markers allow for precision and control, making it easier to create intricate details.
- Alternatively, you can use embroidery thread to sew a mouth onto the bear’s face, giving it a more handmade and personalized touch.
- Ensure that the mouth is proportionate and positioned correctly on the bear’s face to maintain a balanced and expressive look.
Remember, creating the face is an essential step in bringing your hand towel bear to life.
With small buttons or beads for the eyes, a carefully selected material for the nose, and a mouth added using fabric markers or embroidery, you can create a charming bear that will delight both children and adults alike.
Step 5: Adding Final Touches To Bring The Bear To Life
Learn how to bring your bear creation to life by adding the final touches with this step-by-step guide on transforming a hand towel into an adorable bear.
Adding Final Touches To Bring The Bear To Life
Now that you have mastered the art of towel folding and created the basic shape of a bear, it’s time to add those final touches that will truly bring it to life.
Here are some ideas to personalize your handmade bear and make it even more adorable:
Tying A Ribbon Around The Bear’S Neck For A Cute Accessory:
- Select a small ribbon that complements the color of your bear.
- Gently tie the ribbon around the neck of the bear, creating a cute bow or a simple knot.
- Ensure that the ribbon is secure but not too tight, allowing the bear to maintain its shape.
Creating Arms And Legs Using Additional Towels:
- Take two small hand towels and roll them tightly to create the front arms of the bear.
- Attach the arms to the sides of the bear by tucking the ends of the rolled towels into the folds of the main towel body.
- For the legs, fold two more hand towels in half and roll them up, just like you did for the arms.
- Attach the legs by tucking the ends into the bottom fold of the main towel body, positioning them below the bear’s body.
Positioning The Bear In A Sitting Or Standing Position:
- If you want your bear to sit, gently fold the bottom part of the towel body underneath, creating a flat surface for the bear to rest on.
- To make the bear stand, leave the bottom part of the towel body unfolded and adjust the bear’s legs to support its weight.
- Experiment with different positions until you achieve the desired look.
Personalizing The Bear With Small Accessories Or Clothing:
- Get creative and add personalized accessories to give your bear a unique touch. Consider using small bows, buttons, or even googly eyes to create facial features.
- You can also dress up your bear by adding tiny outfits, such as a miniature t-shirt or a heart-shaped necklace.
- Keep in mind that the accessories should be small in scale to suit the size of the bear.
With these final touches, your adorable towel bear will come to life, ready to be displayed or gifted to someone special. Have fun personalizing and showcasing your creative skills with this delightful craft project.
Conclusion
Creating a bear out of a hand towel is a fun and creative project that can bring joy and amusement to both children and adults. The step-by-step instructions provided in this blog post make it easy for anyone to try their hand at towel bear making.
Whether you’re looking to engage in a craft activity with your kids or simply want to add a cute and decorative touch to your home, making a towel bear is a great choice.
Remember to choose the right towel size, follow the folding and shaping techniques carefully, and add the finishing touches to give your bear personality.
With a little bit of practice and patience, you’ll be able to create adorable towel bears that will impress your friends and family.
So gather your materials and get ready to embark on a towel bear-making adventure!


