How to Grow a Rainbow on a Paper Towel? 8 Steps!
Growing a rainbow on a paper towel involves a simple science experiment that uses markers, water, and capillary action.
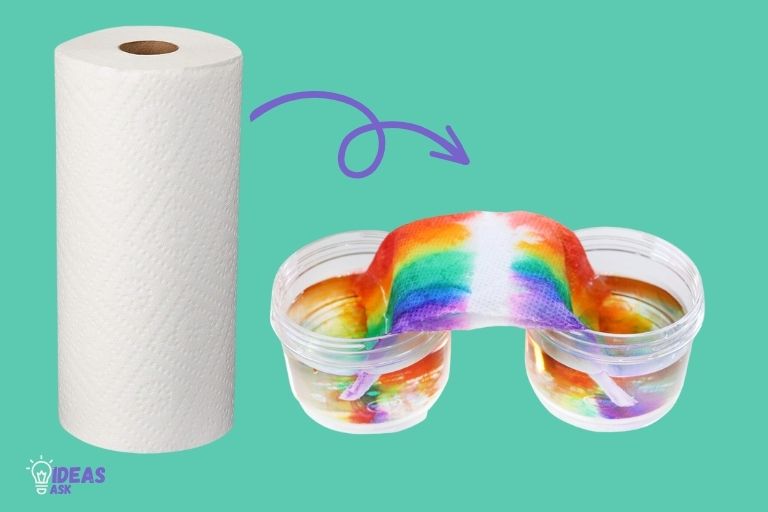
You need to draw thick bands of different colors (in the order of a rainbow) on a paper towel, leaving some space at both ends. Place each end in water and watch as the colors gradually spread and merge to form a rainbow.
Quick Overview
- Start by selecting markers of different bright colors: red, orange, yellow, green, blue, indigo, and violet.
- Using these markers draw thick lines with each color on the edge of a paper towel. Make sure you arrange them in the order they appear in a rainbow.
- Leave some white space at both ends of the color band.
- Now place your paper towel so that each end dips into some water (you can use two cups filled with water for this).
- The water will gradually climb up due to capillary action, causing the ink to spread across the paper towel and create an arch resembling a rainbow.
This experiment provides not only an easy and fun way to illustrate how rainbows form but also teaches kids about capillary action which is how plants draw up water from their roots in an engaging manner.
The ink’s spreading movement imitates how light refracts into different wavelengths (colors) when it passes through droplets of water during actual rainbow formation.
Materials You’ll Need to Grow a Rainbow on a Paper Towel
White Paper Towel:
Choose a plain, unprinted white paper towel. The size can vary, but a standard-sized paper towel will work well for this experiment.
Washable Markers in Various Colors:
You’ll need washable markers in a variety of colors to draw the rainbow. The traditional rainbow colors include red, orange, yellow, green, blue, and purple. Ensure the markers are washable, as you’ll be using them to create the rainbow that will spread with water.
Shallow Dish or Plate:
Select a shallow dish or plate that is large enough to accommodate the entire paper towel without folding or crumpling it. The dish will hold the water for the experiment.
Water:
You’ll need water to wet the bottom of the dish or plate. A small amount is sufficient—just enough to create a thin layer of water at the bottom of the container.
Dropper or Pipette:
A dropper or a pipette is useful for adding water to the dish in a controlled manner. This will help prevent over-saturation of the paper towel.
Optional: Plastic Wrap or Clear Plastic Lid:
While not essential, using plastic wrap or a clear plastic lid to cover the dish can slow down the drying process and create a mini-greenhouse effect. This can extend the duration of your experiment and allow for more observation time.
Having these materials ready will enable you to conduct the experiment effectively and observe how the colors of the rainbow spread on the paper towel due to capillary action and water absorption.
Here Are the Steps How to Grow a Rainbow on a Paper Towel
Growing a rainbow on a paper towel is a fun and educational science experiment that demonstrates the concept of capillary action and how water molecules move through materials.
Here’s a step-by-step guide on how to do it:
1. Prepare Your Work Area:
- Lay down some newspaper or plastic to protect your work surface, as this experiment can get messy.
2. Draw a Rainbow on the Paper Towel:
- Use the washable markers to draw a rainbow on one edge of the paper towel. Start with red at the top, followed by orange, yellow, green, blue, and purple. Make the lines thick and saturated with ink to ensure that the colors spread well.
3. Set Up the Dish:
- Place the shallow dish or plate on your work surface. Make sure it’s large enough to fit the entire paper towel without folding or crumpling it.
4. Add Water:
- Pour a small amount of water into the dish, just enough to wet the bottom of the plate. You don’t want to submerge the paper towel completely, just create a small pool of water.
5. Place the Paper Towel in the Dish:
- Carefully lay the paper towel with the rainbow drawing on top of the water in the dish. Make sure the rainbow end is in the water, and the other end is hanging out over the edge of the dish.
6. Watch and Wait:
- As the paper towel absorbs the water, you’ll start to see the colors from the rainbow spread out along the paper towel. This happens because of capillary action, where the water molecules are drawn up into the paper towel.
7. Optional Cover:
- If you want to slow down the drying process and observe the rainbow for a longer time, you can cover the dish with plastic wrap or a clear plastic lid. This will create a mini greenhouse effect and keep the humidity inside, which can help prolong the experiment.
8.Observe and Document:
- Over the next few hours or even days, watch how the colors continue to spread and blend on the paper towel. Take notes and photos to document the changes.
This experiment is a great way to learn about water absorption and color mixing. It’s also a colorful and visually appealing project that can be done as a science demonstration or as a fun activity with kids.
Conclusion
After following the steps outlined in this post, you should be well on your way to growing your own rainbow on a paper towel.
This unique experiment is not only a fun activity for adults and children alike, but it can also serve as a valuable learning opportunity about the science behind absorption and color mixing.
Remember to use non-toxic materials and to choose a location with good lighting and ventilation to avoid mold or bacterial growth.
With patience, care, and a sense of wonder, you can turn a simple paper towel into a piece of art that will inspire and amaze.
So, why not give it a try and see the magic unfold before your eyes? Who knows, you might just discover your new favorite hobby!

